Congratulations on your brand new Custom Glaze installation. Whether you’ve purchased our windows, doors, bi-folds, patio doors, French doors or a full conservatory, this guide will help you to keep your Custom Glaze products looking good and operating well for many years to come.
We’ve included a variety of useful tips and information to help you follow the correct operating procedures and carry out simple maintenance.
Please spend some time to familiarise yourself with the contents of this page to ensure you enjoy your Custom Glaze installation and get the best from your investment. It is important you follow the guidance on this page to ensure warranties are maintained.
In the unlikely event of any difficulties, please contact Custom Glaze Service Department (01908 650 148) in the first instance, who will be pleased to help you.
Note: Custom Glaze products are technically engineered and require specialist parts and experience to install. Never attempt any repairs to a Custom Glaze product yourself as this may invalidate your warranty – always contact Custom Glaze Service Department (01908 650 148) in the first instance.
Your Custom Glaze products require a minimal amount of care in order to give you trouble-free operation and to remain in optimum condition for many years to come. The following information will show you the most effective way to clean your windows, doors and conservatory roofs.
Standard uPVC frames
- Wash frames with a soap and water solution (dilute washing up liquid is fine), every four months to avoid the build-up of grime and atmospheric deposits.
- For stubborn stains, use a non- abrasive uPVC liquid cleaner. Use sparingly and buff to shine.
- Avoid solvent-based cleaners and take care not to disturb any sealants.
Coloured foiled uPVC frames
- Only use a soap and water solution to clean woodgrained or foiled windows.
- Never use cleaning fluid or solvent-based cleaners.
- Minor scratches can be repaired using a matching RAL touch-up pen.
Glazed units
- Remove all hand jewellery prior to cleaning to avoid scratching.
- Remove any heavy external grime with a soap and water solution first.
- Use any proprietary household cleaner, applying with a soft cloth and buffing to a shine.
- Glass fitted with Georgian bars may be cleaned in exactly the same way.
Leaded glass
- If leaded strips are bonded to the glazed unit, take extra care as excessive pressure may dislodge the lead from the glass surface.
- Use a soft cloth with warm soapy water, applied with moderate pressure.
- Note that external lead will oxidise. This is a natural phenomenon and cannot be avoided.
Conservatory or porch roofs
- Never try to walk on a conservatory roof – always use crawl boards to spread the load if you should need to access the roof.
- Never lean ladders against uPVC frames, gutters or glass as this may result in damage.
- Keep all gutters and outlets clear of leaves and other debris to maintain efficient operation.
Self-cleaning glass
- Do not use abrasive or solvent-based cleaners on the external glazing surface as the self-cleaning properties may be affected.
- Use a soft cloth with warm soapy water and buff to a shine.
- A proprietary household cleaner may be used on the inside of the glass.
Polycarbonate
- Clean in a similar manner to uPVC frames, removing grime and atmospheric deposits every four months to avoid build-up.
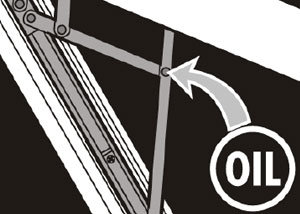
Windows and doors will benefit from periodic lubrication.
- For hardware and opening mechanisms, use light machine oil (for example, 3-in-1 or WD-40).
Drainage
All Custom Glaze products are designed with an in-built drainage system, comprising of slots within the lower thresholds that allow any water ingress to flow on the outside. To ensure an efficient system, these slots must remain unblocked.
Periodically remove dirt, clean drain holes and check the drainage operation by flushing through with water.
Handles and hardware
When installed, your hardware is protected with clear lacquer. Over time and through normal wear and tear, the lacquer may peel or become tarnished. Custom Glaze cannot accept any responsibility for this as it is a natural occurrence.
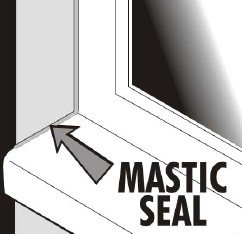
Mastic seal
The mastic seal is the waterproof seal found around your doors and windows. Please note that some dis-colouration of the seal is a natural occurrence and cannot be avoided.
Water vapour is naturally present in the atmosphere.
In the home, this natural water content is increased by normal day to day living – for example, activity that generates steam such as cooking, bathing, laundering, boiling a kettle and even breathing.
The water vapour remains undetectable while floating in warm air – but upon contact with cold surfaces such as windows, mirrors and tiles, condensation occurs as the vapour turns into water droplets.
Traditional house construction used to allow the escape of this water vapour through natural ventilation, including open flues of coal fires, air bricks and ill-fitting windows and doors – however the drive to conserve energy and reduce heating costs has led to the sealing of homes, resulting in trapped water vapour and increased problems of condensation.
With our energy efficient windows and doors, condensation can even form on the outside face of a double glazed unit, due to the outside surface being much colder than the inside – this is perfectly normal and nothing to worry about.
Provide ventilation in your home wherever possible by:
- Opening a window (please bear security in mind when leaving open an easily accessible window).
- Fitting a ventilation or extraction unit in the kitchen and bathroom.
- Fitting wall vents to provide air flow.
Heating
Maintain some heat in the house during cold weather and marginally increase the temperature in areas where condensation is a particular problem.
If possible, fit radiators under windows to maintain the temperature of the inside pane of your double glazing.
An electric dehumidifier can help in problem areas by extracting excess vapour from the air.
Ventilation
Water vapour will easily drift from its originating point due to the convection currents in your home.
To avoid this:
- Keep internal doors to kitchen and bathroom areas closed and draught-sealed where possible.
- Ensure bedrooms are ventilated at night to provide air movement.
If doors must be closed, install a ventilation grille in or above the door. - To ensure air flow in the vicinity of windows, curtains should be a minimum of 150mm (6”) away from the window, with suitable gaps at the top and bottom.
Your windows, doors and roof have been specifically designed to include a number of security features to protect your home and family against intrusion.
Remember: prevention is better than cure.
We recommend the following sensible security precautions should also be taken:
- Never leave a window or door open when your home is unattended.
- Lock all windows whenever they are in the closed position and remove all keys.
- To provide adequate means of escape in an emergency, locate keys adjacent to the window but out of external view.
- When leaving the house unattended at night, ensure door handles are fully lifted and that the keys are turned, in order to throw and lock all deadbolts and shootbolts for full security.
Glass imperfections
All double and triple glazed units are susceptible to a degree of surface damage during the manufacturing process. Certain imperfections in the glass cannot be avoided, even in the most carefully controlled production environment.
Such blemishes and imperfections are therefore beyond our control, but are considered acceptable by even the most rigorous industry standards – we would like to draw your attention to the following extract from an industry-accepted standard in relation to glass:
1. Transparent glass used in the manufacture of double glazed units is identical to that used in traditional single glazing and will therefore have a similar level of quality.
2. Both panes of the double glazed unit shall be viewed from the room side, standing at a distance of two metres (6’6”) in natural daylight and not in direct sunlight. The area to be viewed is the normal vision area, with the exception of a 50mm (2”) wide band around the perimeter of the unit.
3. Flat transparent glass shall be deemed acceptable if the following phenomena are neither obtrusive nor bunched:
- Totally enclosed seeds
- Bubbles or blisters
- Hairlines or blobs
- Fine scratched, not more than 25mm (1”) long
- Minute embedded particles.
4. Obtrusiveness of blemishes shall be judged by looking through the glass and not at it, under normal lighting conditions as described in point 2.
Other glazing information. Your installer has used only the highest quality float glass available, whether laminated, toughened or annealed, which conforms to the requirements of BS 6262. Double glazed units produced to BS 7513 conform to the highest manufacturing standards and the most uncompromising quality control and inspection routines.
Patterned glass originates in very large sheets and due to spacing repetition, centralisation of any design in a specific window cannot be guaranteed.
Extracted from the Glass and Glazing Federation Standards.
Windows may be opened outwards to any angle, and are fitted with friction hinges that hold it in any desired position when open. The locking mechanism fitted to the opening edge of the window engages with slotted ‘keeps’ fitted to the outer frame. The secondary slot within the keep enables the window to provide a ‘night vent’ position, with the window only slightly open whilst providing ventilation.
NB: Accessible windows should not be kept in the ‘night vent’ position when the house is unoccupied.
To open, turn the key if fitted, then push the button in the centre and whilst pressed, turn the handle through 90º to unlock the handle. To close, simply turn the handle back the other way until it engages with the lock. Once closed, turn the key to lock the window and remove it to keep somewhere safe nearby.

- Tilt mode for ventilation
- Turn mode for cleaning and emergency exits
As the name suggests, the tilt mode must be performed prior to turning the window.
NB: The window must always be fully closed before changing the handle’s position.
To operate the window, the handle should be in one of three positions:
Closed, Tilt or Turn – If fitted, turn the key to unlock the window.
To select Tilt mode, rotate the handle through 90º from downwards to horizontal, and pull the window inwards towards you. The bottom of the window will remain hinged to the frame, while the top tilts inwards to allow ventilation. When the key is removed, it is not possible to open the window fully.
To select Turn mode, close the window and rotate the handle through another 90º until it points upwards, then pull the window inwards. The side will now remain hinged to the frame while the window will open inwards to any desired position.


If Retro Fit Window Restrictors are fitted, the restrictor limits the opening of the window to control ventilation.
The restrictor may be disengaged the allow the window to be fully opened.
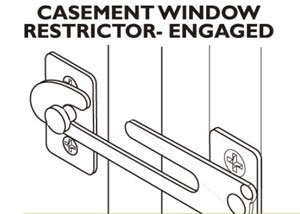
There are two main types of restrictor, the standard casement restrictor and the security restrictor.
To open – restricted
Operate handle and open window. The restrictor arm will limit opening.
To open – fully
Once opened to the restricted position, close the window slightly and manually release the restrictor by lining up the slot opening with the striker post. While holding the latch, open fully.
To close
Close the window in the normal manner. The restrictor will automatically re-engage
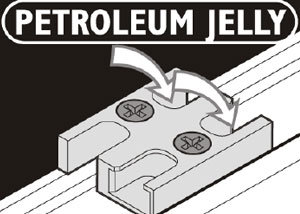
Maintenance
- Ensure frames are free of dirt by cleaning with soap and water
- Check drainage holes and remove any blockages
- Lubricate pivot point with light machine oil
- Minor scratches can be repaired using a matching RAL touch-up pen
- Check for obstructions, signs of wear and ensure fixing screws are secure.
To open, move the lock downwards, take hold of the handle and slide the door open.
To close and lock, simply slide the door into place and click the lock into the upward position.
Maintenance
- Ensure frames and tracks are free of dirt by cleaning with soap and water
- Check drainage holes and remove any blockages
- Lubricate pivot point with light machine oil
- Minor scratches can be repaired using a matching RAL touch-up pen
- Check for obstructions, signs of wear and ensure fixing screws
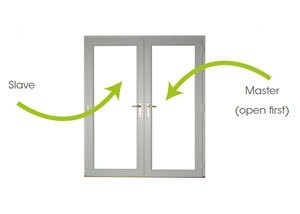
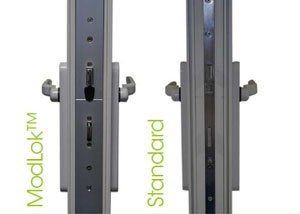
If your bi-fold is a Standard model, you must be sure to open the master door first – if you try to open the slave door, you are at risk of spraining the lock.
If your bi-fold is a ModLok™ model, you will be unable to open the slave door first – the master door handle is the only one that can be opened first.
Maintenance Opening
- Rolling mechanisms carrying the doors panels are fitted with sealed stainless steel bearing and require no lubrication.
- Ensure top and bottom tracks are kept free from debris, which may impair the function.
- Door locking mechanisms should be cleaned and any moving parts lubricated with a light machine oil and least once a year and more frequently where appropriate.
On installation if you have any issues with the appearance or operation of the blinds you should immediately refer to our fitter for advice and help.
Failure to maintain the blinds may cause internal damage and invalidate the warranty.
Blind Operation
The blinds utilise a very stable and reliable system which requires low levels of maintenance to ensure full and long lasting operation.
Operated by either control magnets in a case sliding on rollers on the surface of the glass or a looped cord, the blinds can be fully raised and lowered, and tilted and turned.
The sliding magnets sit over tracks at the sides (or bottom for tilt/turn only blinds) of the sealed unit. The blinds can be raised/lowered and tilted/turned by sliding the control magnets up or down their tracks. The magnets may be held in the correct position over the track by guide rails (if fitted) which ensure the magnets cannot come loose from the window or door. There will be no difference in operation of the blinds whether fitted with or without the guide rails.
For best operation the slats must be in the horizontal position before the blind is raised. When the slats are being raised or lowered it is advisable to look at the slats whilst operating the blind; in this way pressure can be reduced as approaching the fully raised or fully lowered position. This will avoid the magnet slipping out of alignment with the magnets inside the track.
It is acceptable for the magnets to come out of alignment with the magnets inside the sealed unit if forced beyond their correct limits of operation. This is to ensure the cords do not become stretched or broken through excessive force being applied on the system.
The looped cord operation both raises/lowers and tilts/turns the slats. To lower the slats pull the left-hand cord downwards. At any stage during the lowering operation the slats can remain in the position achieved and can be tilted and turned by pulling down on the right-hand cord. To continue lowering the slats carry on pulling downwards on the left-hand cord until the slats are fully lowered. The slats can then be tilted and turned by pulling on the right-hand cord.
To raise the slats pull downwards on the right-hand cord until the slats are raised to the desired position.
Cleaning
To ensure that the control magnets remain easy to operate it is necessary to clean the glass tracks and back of the magnets (if not fitted with guide rails) at regular intervals.
The glass tracks should be cleaned a minimum of every three months to maintain satisfactory operation. The backs of magnets and the rollers on their carriages may be cleaned providing no guide rails are fitted.
Cleaning should be done with a cloth damped with water only. No solvents or cleaning fluids should be used.
The cords should only be cleaned with a cloth damped with water.
A suitable anti-friction dry PTFE spray (which dries to a colourless film) may be used to resist dirt and dust. Immediately after spraying on the track the magnetic control should be run over the sprayed area to spread the application over the entire track used and the back of the magnetic control.
It is recommended that the application be reapplied after washing/cleaning the glass.
Replacing and Relocating the Magnets
If guide rails are not fitted it will be possible to remove the magnetic controllers by sliding them sideways off the tracks on the surface of the glass.
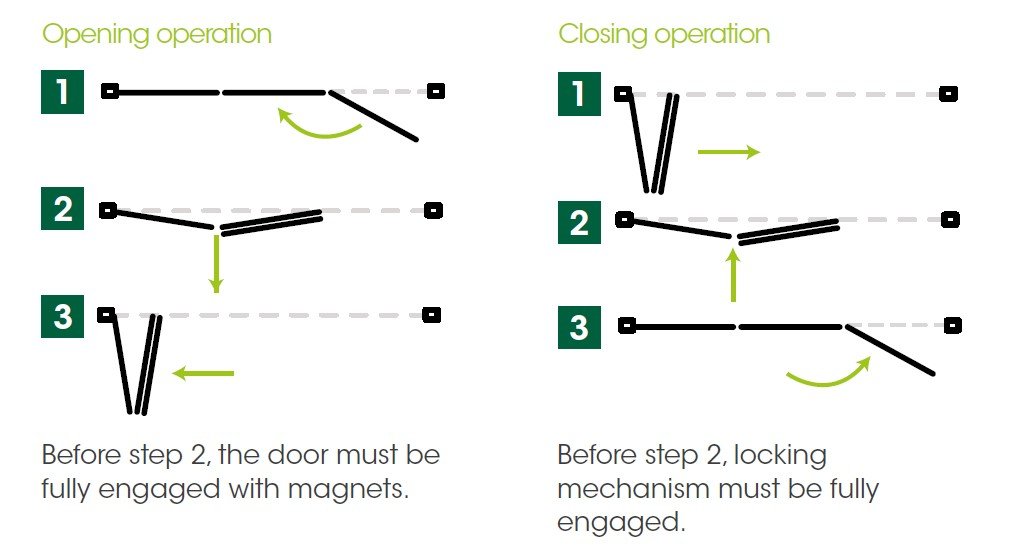
To replace or relocate a magnetic controller in the correct location it should be positioned on the surface of the glass at the top of the track. The magnet should then be slid slowly down the track until a light pressure is felt as it begins to engage with the magnet inside the track. The magnet should be slid further down the track until a greater pressure is felt. Push the magnets still further downwards until a loud ‘click’ is heard; at this point the magnetic controller is fully engaged with the magnets within the unit. The blind can then be operated normally. This will apply to both the raise/lower and the tilt/turn functions.
Please contact Custom Glaze Service on 01908 650 148 if you need any further advice.